 Greetings friends, for many years, changing or adding an SSL certificate to our VMware vCenter has been a real pain, there are tens of KB, and hundreds of posts in the Community with errors of all kinds once you flirt with the steps. But from 6.7 onwards it seems that the process has been simplified a lot, so today I come to show you the steps to install your own SSL Certificate in VCSA, also free created with Let’s Encrypt.
NOTE: The Let’s Encrypt CA expired, you can get a workaround if you use the latest certbot, from snap on ubuntu, and you have you VCSA completely clean of old CA, and root certificates. Meaning, before you follow these steps, please clean your system – https://jorgedelacruz.uk/2021/11/23/vmware-fixing-annoying-error-cannot-connect-to-profile-driven-storage-service-related-to-ssl-certificates/
Installation of system requirements (certbot)
Let’s install certbot on a Linux machine outside the VCSA itself. As simple as launching the following:
sudo apt-add-repository -r ppa:certbot/certbot
This will allow us to update our packages and then install what is required:
sudo apt-get update
sudo apt install python-certbot-apache
We have everything ready, let’s go to the next step.
Launch acme command to generate a Let’s Encrypt SSL Certificate
We have several validation options to request the SSL certificate and be granted it, in this case, I will use the simplest, but manual, which is using the manual DNS mode that will give us a TXT record that we have to put in our public DNS.
The command to be launched to request the SSL certificate is the following, be careful to change your FQDN of your vCenter, and your email to get the alerts when it expires. This command is also useful when you want to renew:
certbot --manual --preferred-challenges dns certonly -d vcsa.jorgedelacruz.es --staple-ocsp -m jorgedlcruz@gmail.com --agree-tos --force-renewal
This will show us output similar to this, we will answer Yes so that our IP is stored and then have its statistics:
Saving debug log to /var/log/letsencrypt/letsencrypt.log
Plugins selected: Authenticator manual, Installer None
Obtaining a new certificate
Performing the following challenges:
dns-01 challenge for vcsa.jorgedelacruz.es

- - - - - - - - - - - - - - - - - - - - - - - - - - - - - - - - - - - - - - - -
NOTE: The IP of this machine will be publicly logged as having requested this
certificate. If you're running certbot in manual mode on a machine that is not
your server, please ensure you're okay with that.

Are you OK with your IP being logged?
- - - - - - - - - - - - - - - - - - - - - - - - - - - - - - - - - - - - - - - -
(Y)es/(N)o: yes
Once we press yes, it will ask us to create the next TXT in our public DNS:
- - - - - - - - - - - - - - - - - - - - - - - - - - - - - - - - - - - - - - - -
Please deploy a DNS TXT record under the name
_acme-challenge.vcsa.jorgedelacruz.es with the following value:

kF8R0icb8zE3vgsJyOVWJqBbXdeU0AWJk0veEsh7eKg

Before continuing, verify the record is deployed.
- - - - - - - - - - - - - - - - - - - - - - - - - - - - - - - - - - - - - - - -
Press Enter to Continue
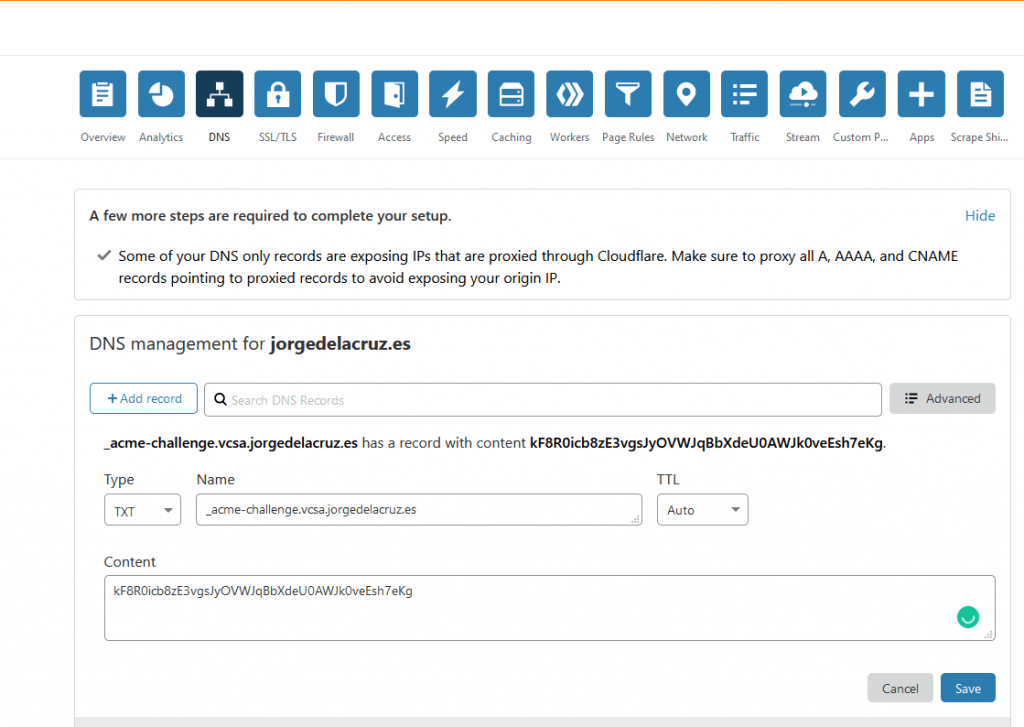
I go to my public DNS provider and create the entry as indicated by the console:
Now that I have everything, I go back to my console and press Enter, to see that everything works and I have my SSL certificate:
Waiting for verification...
Cleaning up challenges

IMPORTANT NOTES:
- Congratulations! Your certificate and chain have been saved at:
/etc/letsencrypt/live/vcsa.jorgedelacruz.es/fullchain.pem
Your key file has been saved at:
/etc/letsencrypt/live/vcsa.jorgedelacruz.es/privkey.pem
Your cert will expire on 2021-04-09. To obtain a new or tweaked
version of this certificate in the future, simply run certbot
again. To non-interactively renew *all* of your certificates, run
"certbot renew"
- If you like Certbot, please consider supporting our work by:

Donating to ISRG / Let's Encrypt: https://letsencrypt.org/donate
Donating to EFF: https://eff.org/donate-le
Locate SSL Certificate in our vCenter Appliance (VCSA)
If you have generated this in another Linux, as recommended, we will have to create three files within our VCSA: cert.pem, privkey.pem, and fullchain.pem.
As you can imagine, including the content of /etc/letsencrypt/live/vcsa.jorgedelacruz.es/cert.pem inside the new file /root/cert.pem inside VCSA.
The content of /etc/letsencrypt/live/vcsa.jorgedelacruz.es/privkey.pem inside /root/privkey.pem
If you are using vSphere 7.0U2 and above you do not need to do this, jump to the next step, which is Install Let’s Encrypt Certificate.
Create a new fullchain.pem valid for vCenter Server 7.0 U1 or below
For some time now, it seems that VMware has become a little more demanding with Intermediate CA’s, etc. So the fullchain.pem that automatically creates Let’s Encrypt is useless and will give us an error when deploying it, so that we do not have problems, we will have to create a new file, I have called it fullchain2021.pem
vi fullchain2021.pem
And inside I have combined the Intermediate Certificates Let’s Encrypt Authority X3 (IdenTrust cross-signed)
We will combine that previous file with the next DST Root CA X3that you can find here:
All together should be something like this:
-----BEGIN CERTIFICATE-----
MIIEkjCCA3qgAwIBAgIQCgFBQgAAAVOFc2oLheynCDANBgkqhkiG9w0BAQsFADA/
MSQwIgYDVQQKExtEaWdpdGFsIFNpZ25hdHVyZSBUcnVzdCBDby4xFzAVBgNVBAMT
DkRTVCBSb290IENBIFgzMB4XDTE2MDMxNzE2NDA0NloXDTIxMDMxNzE2NDA0Nlow
SjELMAkGA1UEBhMCVVMxFjAUBgNVBAoTDUxldCdzIEVuY3J5cHQxIzAhBgNVBAMT
GkxldCdzIEVuY3J5cHQgQXV0aG9yaXR5IFgzMIIBIjANBgkqhkiG9w0BAQEFAAOC
AQ8AMIIBCgKCAQEAnNMM8FrlLke3cl03g7NoYzDq1zUmGSXhvb418XCSL7e4S0EF
q6meNQhY7LEqxGiHC6PjdeTm86dicbp5gWAf15Gan/PQeGdxyGkOlZHP/uaZ6WA8
SMx+yk13EiSdRxta67nsHjcAHJyse6cF6s5K671B5TaYucv9bTyWaN8jKkKQDIZ0
Z8h/pZq4UmEUEz9l6YKHy9v6Dlb2honzhT+Xhq+w3Brvaw2VFn3EK6BlspkENnWA
a6xK8xuQSXgvopZPKiAlKQTGdMDQMc2PMTiVFrqoM7hD8bEfwzB/onkxEz0tNvjj
/PIzark5McWvxI0NHWQWM6r6hCm21AvA2H3DkwIDAQABo4IBfTCCAXkwEgYDVR0T
AQH/BAgwBgEB/wIBADAOBgNVHQ8BAf8EBAMCAYYwfwYIKwYBBQUHAQEEczBxMDIG
CCsGAQUFBzABhiZodHRwOi8vaXNyZy50cnVzdGlkLm9jc3AuaWRlbnRydXN0LmNv
bTA7BggrBgEFBQcwAoYvaHR0cDovL2FwcHMuaWRlbnRydXN0LmNvbS9yb290cy9k
c3Ryb290Y2F4My5wN2MwHwYDVR0jBBgwFoAUxKexpHsscfrb4UuQdf/EFWCFiRAw
VAYDVR0gBE0wSzAIBgZngQwBAgEwPwYLKwYBBAGC3xMBAQEwMDAuBggrBgEFBQcC
ARYiaHR0cDovL2Nwcy5yb290LXgxLmxldHNlbmNyeXB0Lm9yZzA8BgNVHR8ENTAz
MDGgL6AthitodHRwOi8vY3JsLmlkZW50cnVzdC5jb20vRFNUUk9PVENBWDNDUkwu
Y3JsMB0GA1UdDgQWBBSoSmpjBH3duubRObemRWXv86jsoTANBgkqhkiG9w0BAQsF
AAOCAQEA3TPXEfNjWDjdGBX7CVW+dla5cEilaUcne8IkCJLxWh9KEik3JHRRHGJo
uM2VcGfl96S8TihRzZvoroed6ti6WqEBmtzw3Wodatg+VyOeph4EYpr/1wXKtx8/
wApIvJSwtmVi4MFU5aMqrSDE6ea73Mj2tcMyo5jMd6jmeWUHK8so/joWUoHOUgwu
X4Po1QYz+3dszkDqMp4fklxBwXRsW10KXzPMTZ+sOPAveyxindmjkW8lGy+QsRlG
PfZ+G6Z6h7mjem0Y+iWlkYcV4PIWL1iwBi8saCbGS5jN2p8M+X+Q7UNKEkROb3N6
KOqkqm57TH2H3eDJAkSnh6/DNFu0Qg==
-----END CERTIFICATE-----
-----BEGIN CERTIFICATE-----
MIIDSjCCAjKgAwIBAgIQRK+wgNajJ7qJMDmGLvhAazANBgkqhkiG9w0BAQUFADA/
MSQwIgYDVQQKExtEaWdpdGFsIFNpZ25hdHVyZSBUcnVzdCBDby4xFzAVBgNVBAMT
DkRTVCBSb290IENBIFgzMB4XDTAwMDkzMDIxMTIxOVoXDTIxMDkzMDE0MDExNVow
PzEkMCIGA1UEChMbRGlnaXRhbCBTaWduYXR1cmUgVHJ1c3QgQ28uMRcwFQYDVQQD
Ew5EU1QgUm9vdCBDQSBYMzCCASIwDQYJKoZIhvcNAQEBBQADggEPADCCAQoCggEB
AN+v6ZdQCINXtMxiZfaQguzH0yxrMMpb7NnDfcdAwRgUi+DoM3ZJKuM/IUmTrE4O
rz5Iy2Xu/NMhD2XSKtkyj4zl93ewEnu1lcCJo6m67XMuegwGMoOifooUMM0RoOEq
OLl5CjH9UL2AZd+3UWODyOKIYepLYYHsUmu5ouJLGiifSKOeDNoJjj4XLh7dIN9b
xiqKqy69cK3FCxolkHRyxXtqqzTWMIn/5WgTe1QLyNau7Fqckh49ZLOMxt+/yUFw
7BZy1SbsOFU5Q9D8/RhcQPGX69Wam40dutolucbY38EVAjqr2m7xPi71XAicPNaD
aeQQmxkqtilX4+U9m5/wAl0CAwEAAaNCMEAwDwYDVR0TAQH/BAUwAwEB/zAOBgNV
HQ8BAf8EBAMCAQYwHQYDVR0OBBYEFMSnsaR7LHH62+FLkHX/xBVghYkQMA0GCSqG
SIb3DQEBBQUAA4IBAQCjGiybFwBcqR7uKGY3Or+Dxz9LwwmglSBd49lZRNI+DT69
ikugdB/OEIKcdBodfpga3csTS7MgROSR6cz8faXbauX+5v3gTt23ADq1cEmv8uXr
AvHRAosZy5Q6XkjEGB5YGV8eAlrwDPGxrancWYaLbumR9YbK+rlmM6pZW87ipxZz
R8srzJmwN0jP41ZL9c8PDHIyh8bwRLtTcm1D9SZImlJnt1ir/md2cXjbDaJWFBM5
JDGFoqgCWjBH4d1QB7wCCZAA62RjYJsWvIjJEubSfZGL+T0yjWW06XyxV3bqxbYo
Ob8VZRzI9neWagqNdwvYkQsEjgfbKbYK7p2CNTUQ
-----END CERTIFICATE-----
Okay, we are very close to the end, we already have three files inside our VCSA 7, in the root folder:
root@vcsa [ ~ ]# ls -la *.pem
-rw-r--r-- 1 root root 1862 Jan 9 11:26 cert.pem
-rw-r--r-- 1 root root 3448 Jan 9 11:27 fullchain2021.pem
-rw-r--r-- 1 root root 1704 Jan 9 11:27 privkey.pem
Install Let’s Encrypt SSL Certificate in VCSA with certificate-manager via shell
As we are still inside our VCSA by shell, we can make use of the new certificate manager that is included in a few editions, to invoke it as simple as launching:
/usr/lib/vmware-vmca/bin/certificate-manager
That will show us the following menu, we will press 1:
                 _ _ _ _ _ _ _ _ _ _ _ _ _ _ _ _ _ _ _ _ _ _ _ _ _ _ _ _ _ _ _ _ _ _ _
                |                                                                     |
                |      *** Welcome to the vSphere 6.8 Certificate Manager  ***        |
                |                                                                     |
                |                   -- Select Operation --                            |
                |                                                                     |
                |      1. Replace Machine SSL certificate with Custom Certificate     |
                |                                                                     |
                |      2. Replace VMCA Root certificate with Custom Signing           |
                |         Certificate and replace all Certificates                    |
                |                                                                     |
                |      3. Replace Machine SSL certificate with VMCA Certificate       |
                |                                                                     |
                |      4. Regenerate a new VMCA Root Certificate and                  |
                |         replace all certificates                                    |
                |                                                                     |
                |      5. Replace Solution user certificates with                     |
                |         Custom Certificate                                          |
                |         NOTE: Solution user certs will be deprecated in a future    |
                |         release of vCenter. Refer to release notes for more details.|
                |                                                                     |
                |      6. Replace Solution user certificates with VMCA certificates   |
                |                                                                     |
                |      7. Revert last performed operation by re-publishing old        |
                |         certificates                                                |
                |                                                                     |
                |      8. Reset all Certificates                                      |
                |_ _ _ _ _ _ _ _ _ _ _ _ _ _ _ _ _ _ _ _ _ _ _ _ _ _ _ _ _ _ _ _ _ _ _|
Note : Use Ctrl-D to exit.
Option[1 to 8]: 1
This will ask us for credentials with permissions to operate the SSL Certificates within vsphere.local (or your SSO), in my case I will use administrator:
Please provide valid SSO and VC privileged user credential to perform certificate operations.
Enter username [Administrator@vsphere.local]:
Enter password:
Now we will select the second option to select our own SSL Certificate
1. Generate Certificate Signing Request(s) and Key(s) for Machine SSL certificate
2. Import custom certificate(s) and key(s) to replace existing Machine SSL certificate

Option [1 or 2]: 2
Please provide valid custom certificate for Machine SSL.
File : /root/cert.pem
Please provide valid custom key for Machine SSL.
File : /root/privkey.pem
Please provide the signing certificate of the Machine SSL certificate
File : /root/fullchain2.pem
And we will already select yes in this last question, the services will be restarted automatically:
You are going to replace Machine SSL cert using custom cert
Continue operation : Option[Y/N] ? : y
Command Output: /root/cert.pem: OK

Get site nameCompleted [Replacing Machine SSL Cert...]
default-site
Lookup all services
Get service default-site:c528e353-4680-4885-9e07-6d1d5b5b632d
Don't update service default-site:c528e353-4680-4885-9e07-6d1d5b5b632d
Get service default-site:612774a5-5093-4eaa-892c-d5735d3af0fe
...
Get service 9ae1be99-aabd-47a5-bd9a-f97f74eaf78f_com.vmware.vcenter.wcp
Don't update service 9ae1be99-aabd-47a5-bd9a-f97f74eaf78f_com.vmware.vcenter.wcp
Updated 0 service(s)
Status : 100% Completed [All tasks completed successfully]
Check that our VCSA already has the new valid SSL Certificate
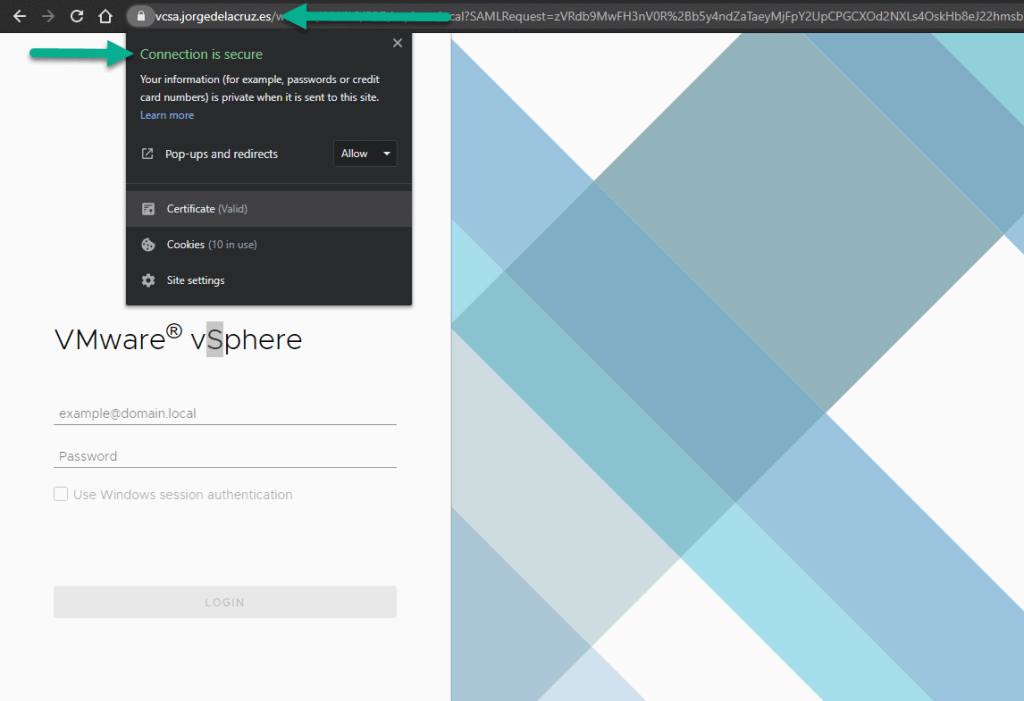
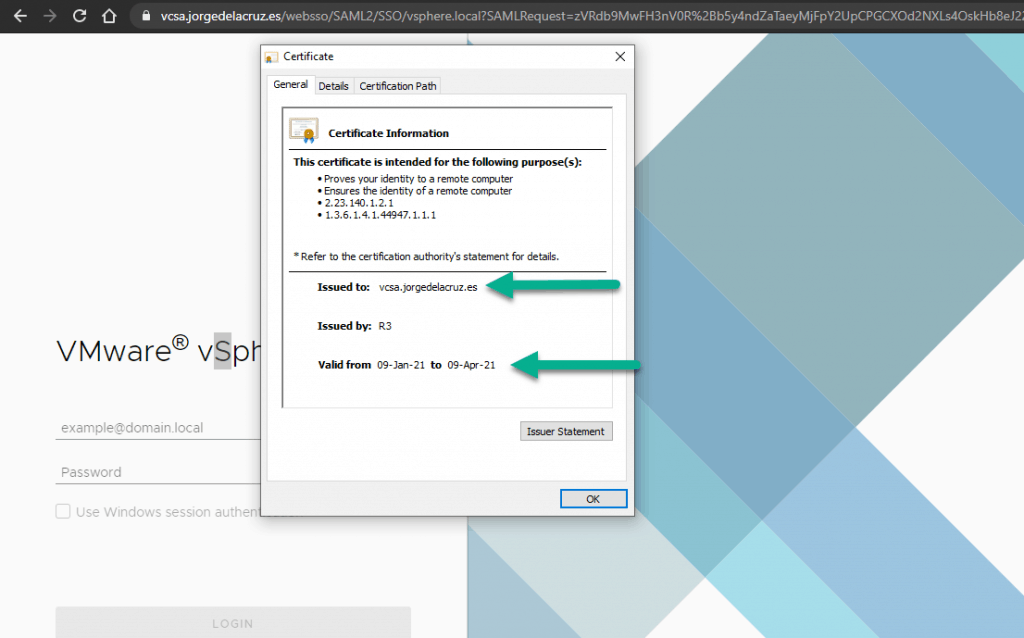
The moment of truth has arrived, we will go to our vCenter, remember that the certificate is only valid for the FQDN, if you access by IP it will always come out that it is not secure, and if it is the FQDN we will see the so desired green lock:  In addition, we can see when the SSL certificate expires, properties, etc:
 If we want to monitor our SSL Certificate to see when it expires so that we can renew it, I have a ticket for that:
That’s all friends, I hope you like it and find it useful. A big greeting.

Not functional. In procedure to create SSL certificate, you indicate to download acme software and you use certbot to generate certificate. Search error…..
Hello, updated with the proper steps, all using certbot, outside the VCSA itself.
It can be done with acme, and I’ve started using that inside the VCSA, but probably more dirty and adding stuff inside an appliance that should not be touched, so. Give it another try.
excellent, the fullchain trick did it!
Fantastic news!
This worked well for me when I installed my first vCenter server 7. A recent VMware update broke my VCSA so thought I would start again with a new install of VMware-VCSA-all-7.0.2-17920168 and it is no longer working. I get
/root/cert.pem: CN = vc.mydomain.com
error 20 at 0 depth lookup:unable to get local issuer certificate
What is interesting is I get the same with openssl but not with the standard fullchain.pem from /etc/letsencrypt/live/vc.mydomain.com
root@vc [ ~ ]# openssl verify -CAfile /root/fullchain2021.pem /root/cert.pem
/root/cert.pem: CN = vc.mydomain.com
error 20 at 0 depth lookup:unable to get local issuer certificate
root@vc [ ~ ]# openssl verify -CAfile /root/fullchain.pem /root/cert.pem
/root/cert.pem: OK
So I tried again, this time using the provided fullchain.pem not the one you helped us create and it worked
Hope this helps others
Hello,
Will give it a try and let you know, it might need updating, this is as picky, or not picky, VMware is with the fullchain
Thank you!
Hi all, it’s look like that it not working with a wilcard SSL certificate issued from letsencrypt with vCenter 7.0U2a
Get service 9e0dfdbf-af5b-44cb-9f1c-555eee8f276f_com.vmware.vsphere.client
Don’t update service 9e0dfdbf-af5b-44cb-9f1c-555eee8f276f_com.vmware.vsphere.client
Get service 4ddfe397-e937-4b0f-8fc2-62740965794e
Update service 4ddfe397-e937-4b0f-8fc2-62740965794e; spec: /tmp/svcspec_kawvk8mw
Get service 510052a8-dd7b-4ac3-8926-86c64ec60e4d
Don’t update service 510052a8-dd7b-4ac3-8926-86c64ec60e4d
Get service c0ed68e9-1bd7-4134-aeed-16113165a102
Update service c0ed68e9-1bd7-4134-aeed-16113165a102; spec: /tmp/svcspec__4g0g6_4
Get service 9e0dfdbf-af5b-44cb-9f1c-555eee8f276f_com.vmware.lcm.client
Don’t update service 9e0dfdbf-af5b-44cb-9f1c-555eee8f276f_com.vmware.lcm.client
Get service 9e0dfdbf-af5b-44cb-9f1c-555eee8f276f_com.vmware.vcenter.wcp
Don’t update service 9e0dfdbf-af5b-44cb-9f1c-555eee8f276f_com.vmware.vcenter.wcp
Updated 43 service(s)
Rollback Status : 100% Completed [Rollback completed successfully]
Regards
Hello,
Did this ever work with a Wildcard at all? I remember that in the past you needed that the SSL has all the SubjectAltNames, etc. Have you tried what Scott White recommended regarding the fullchain, might be that?
Let me know
Hello, I confirm that a wildcard doesn’t work on vcenter, I issued another certificat with full qualified name and it’s worked with the fullchain.cer issued from LetsEncrypt.
Thank’s a lot for the article that helped me.
Great work! Thanks for letting us know.
Cheers!
I just did this and had the same problem (and solution) that Scott White had. Using the fullchain from certbot solved the problem.
My VCSA is 7.0U2 so perhaps it was a recent change caused by the update?
Thanks for the tutorial, I’m really getting tired of refreshing and ignoring security warnings
Hi Josh,
Yes, it works now with the normal fullchain, will update the blog
Now you need to renew it every 3 months, but besides that, yes, much better!
Sounds good so far, but unfortunately it doesn’t work (anymore) like this.
The link you provided (https://www.identrust.com/dst-root-ca-x3) says, that something has changed and it makes you download a p7b-file with I can’t make anything out of it unfortunately. Maybe you can adjust your tutorial and help me and others out again!?
Hello,
Yes, I have been working on it for a few days, my Center is doing something really strange and it does not start the services, will try with a new vCenter and let you know.
I’m on VCSA 7.0.3.00000 and I haven’t had any luck getting letsencrypt certificates properly installed. Letsencrypt is now using a new root ISRG Root X1 and a new intermediate R3. You can find the new chain of trust at https://letsencrypt.org/certificates/
I’ve tried using the fullchain.pem returned by letsencrypt.
I’ve tried modifying the method above with the new certificates (with different combinations of both self-signed and cross-signed versions)
If you try to run an openssl verify with the CAfile as the fullchain returned from letsencrypt, the verify will fail.
If you try to run an openssl verify with the fullchain created by concatenating the new self-singed R3 and self-signed ISRG Root X1 the verify will succeed.
No matter what I provide for signing certificate, the certificate manager will apply the certs and then roll-back to the previous configuration. It should accept the concatenated self-signed ISRG Root X1 and R3 (because the openssl verify is passing), but it doesn’t. I suspect that VMware has broken certificates again; they have a long history of overcomplicating a process most other projects seem to have figured out.
Ultimately, I had to choose option 3. Replace Machine SSL certificate with VMCA Certificate and accept running on a certificate issued by the self-signed VMCA. Leaving my older (expired) letsencrypt certificate in place broke vCenter and applying a new letsencrypt cert resulted in rolling back to the previous expired cert.
In the past (on 6.5 versions), you could push ctl+C as soon as the roll-back starts and the new certificate would be left in place. I don’t recommend this method, but I did try it. I found this to be pointless however because vCenter was not serving the intermediate certificates with the server cert; the result is a broken SSL connection in my browser (Chrome on MacOS).
TL:DR – I suspect VMware has broken certificates in the VCSA yet again; I’m going to roll with a cert from the self-signed VMCA; I think I may forever be done with trying to run certs on this busted product because I’ve already waisted too many hours on this over the course of several years; I’ll monitor this thread… maybe one of you will point out I made a mistake or find a solution.
Hello,
I have literally spent like 3 hours at night, for five days in a row trying all methods, my chain is okay, I have tried with the self-signed R3, and ISGR Root X1 as you suggested, tried to upgrade to U3, I have tried everything, between the Let’s Encrypt fiasco with the Root CA, and VMware being extremely picky with all of it, I am tired same as you, will give it one last try tonight, and if not, will mark this as non valid method anymore, although it have been working fine until Let’s Encrypt broke their CA
I gave up for now, so I am using another service and it worked very well, the steps can be found here https://jorgedelacruz.uk/2021/10/18/vmware-how-to-secure-our-vcenter-server-7-vcsa-with-a-zerossl-certificate/ finally green lock again, jesuschrist!
The issue is that the OpenSSL version (and likely many other libraries) will fail when the old/expired DST Root CA X3 is seen as an invalid cert in any path – in the case of any cert issued by LE this will mean that with these versions of OpenSSL and libraries the cert chain will fail.
The solution is to scalpel out the failed CA from the trusted CA store: https://www.frozenak.com/2020/11/02/vsphere-ssl-certificate-issues-trust-anchors/ as well as remove the expired trust achors https://www.frozenak.com/2020/11/02/vsphere-ssl-certificate-issues-trust-anchors/
This makes it start with an LE cert, however I’ve hit a problem with the SDK endpoint still not functioning correctly so I’m still confirming what that issue is and whether its related
Yes, it is has been a real pain. To the point, I’ve broken my VCSA and I could not access storage policies and others by trying to remove the trusted CA, and others. My solution? This very fresh article – https://jorgedelacruz.uk/2021/11/23/vmware-fixing-annoying-error-cannot-connect-to-profile-driven-storage-service-related-to-ssl-certificates/ After that, you will have all fresh, and you can try Let’s Encrypt again if you like, with the new CA, etc.
Although, I have transitioned to ZeroSSL for now, and all is working smoothly.
Whenever I replace this certificate, the vcenter takes it, but I can no longer access the UI. All I see is a message that states “no healthy upstream”? Have you seen this before?
Hello,
My advice will be, clean all your system, using this https://jorgedelacruz.uk/2021/11/23/vmware-fixing-annoying-error-cannot-connect-to-profile-driven-storage-service-related-to-ssl-certificates/ then use the latest lets encrypt from certbot, from snap not from repo, and try that way.
Or better, clean the system and run ZeroSSL – https://jorgedelacruz.uk/2021/10/18/vmware-how-to-secure-our-vcenter-server-7-vcsa-with-a-zerossl-certificate/
Let me know
Gosh I have made it work on the latest VCSA 7.0.3.00600 following this guys instructions https://virtuallywired.io/2021/11/29/replace-default-vcenter-certificate-with-a-free-lets-encrypt-ssl/
Basically
curl -o /tmp/lets-encrypt-r3.pem https://letsencrypt.org/certs/lets-encrypt-r3.pem
curl -o /tmp/isrgrootx1.pem https://letsencrypt.org/certs/isrgrootx1.pem.txt
scp /tmp/cert.pem /tmp/chain.pem /etc/letsencrypt/live/vc.whatever.me/privkey.pem root@vc.whatever.me:
Then go through the normal /usr/lib/vmware-vmca/bin/certificate-manager and it works
Now to see if I can adjust his automation here https://github.com/virtuallywired/Install-vCenterSSL/blob/main/Install-vCenterSSL.ps1
AMAZING! Will give it a try and update the steps, thanks for being stubborn with this, I almost gave up after a million of attempts.
Appreciated it!
I wanted to let you know it is possible to also do this with 8.0.0.10200 if you use /usr/lib/vmware-vmca/bin/certificate-manager and the method from virtuallywired to create the keys
docker-compose -f /root/certbot/docker-compose.yml run –rm certbot-renew #Or whatever method to use to get your keys
cat /etc/letsencrypt/lets-encrypt-r3.pem /etc/letsencrypt/isrgrootx1.pem > /tmp/chain.pem
cat /etc/letsencrypt/live/vc.mydomain.me/cert.pem /etc/letsencrypt/lets-encrypt-r3.pem /etc/letsencrypt/isrgrootx1.pem > /tmp/cert.pem
scp /tmp/cert.pem vc.mydomain.me:
scp /etc/letsencrypt/live/vc.mydomain.me/privkey.pem vc.mydomain.me:
scp /tmp/chain.pem vc.mydomain.me:
Then use /usr/lib/vmware-vmca/bin/certificate-manager to update.
Please provide valid custom certificate for Machine SSL.
File : /root/cert.pem
Please provide valid custom key for Machine SSL.
File : /root/privkey.pem
Please provide the signing certificate of the Machine SSL certificate
File : /root/chain.pem
My previous method of automating this with 7 sadly no longer works. I used to combine the certs as you describe and then run
ssh vc.mydomain.me service-control –stop –all
ssh vc.mydomain.me service-control –start vmafdd
ssh vc.mydomain.me service-control –start vmdird
ssh vc.mydomain.me service-control –start vmcad
ssh vc.mydomain.me /usr/lib/vmware-vmafd/bin/vecs-cli entry delete –store MACHINE_SSL_CERT –alias __MACHINE_CERT -y
ssh vc.mydomain.me /usr/lib/vmware-vmafd/bin/vecs-cli entry create –store MACHINE_SSL_CERT –alias __MACHINE_CERT –cert /root/cert.pem –key /root/privkey.pem
ssh vc.mydomain.me service-control –start –all
This results in vmware-content-library failing to start and a 500 error on the URL. I suspect it has something to do with the following being added to the instructions
https://docs.vmware.com/en/VMware-vSphere/8.0/vsphere-authentication/GUID-DC693417-78CF-477F-9A4F-AFC9AA1D74E7.html
/usr/lib/vmware-lookupsvc/tools/ls_update_certs.py –url https:///lookupservice/sdk –certfile –user ‘administrator@vsphere.local’ –password ” –fingerprint
but I am probably going to need to dig through the logs for certificate-manager to be sure
Yes, using this guide was able to get this working. The old cross signed certificates had expired so needed to add the new within the chain.pem:
—–BEGIN CERTIFICATE—–
MIIFYDCCA0igAwIBAgIQCgFCgAAAAUUjyES1AAAAAjANBgkqhkiG9w0BAQsFADBK
MQswCQYDVQQGEwJVUzESMBAGA1UEChMJSWRlblRydXN0MScwJQYDVQQDEx5JZGVu
VHJ1c3QgQ29tbWVyY2lhbCBSb290IENBIDEwHhcNMTQwMTE2MTgxMjIzWhcNMzQw
MTE2MTgxMjIzWjBKMQswCQYDVQQGEwJVUzESMBAGA1UEChMJSWRlblRydXN0MScw
JQYDVQQDEx5JZGVuVHJ1c3QgQ29tbWVyY2lhbCBSb290IENBIDEwggIiMA0GCSqG
SIb3DQEBAQUAA4ICDwAwggIKAoICAQCnUBneP5k91DNG8W9RYYKyqU+PZ4ldhNlT
3Qwo2dfw/66VQ3KZ+bVdfIrBQuExUHTRgQ18zZshq0PirK1ehm7zCYofWjK9ouuU
+ehcCuz/mNKvcbO0U59Oh++SvL3sTzIwiEsXXlfEU8L2ApeN2WIrvyQfYo3fw7gp
S0l4PJNgiCL8mdo2yMKi1CxUAGc1bnO/AljwpN3lsKImesrgNqUZFvX9t++uP0D1
bVoE/c40yiTcdCMbXTMTEl3EASX2MN0CXZ/g1Ue9tOsbobtJSdifWwLziuQkkORi
T0/Br4sOdBeo0XKIanoBScy0RnnGF7HamB4HWfp1IYVl3ZBWzvurpWCdxJ35UrCL
vYf5jysjCiN2O/cz4ckA82n5S6LgTrx+kzmEB/dEcH7+B1rlsazRGMzyNeVJSQjK
Vsk9+w8YfYs7wRPCTY/JTw436R+hDmrfYi7LNQZReSzIJTj0+kuniVyc0uMNOYZK
dHzVWYfCP04MXFL0PfdSgvHqo6z9STQaKPNBiDoT7uje/5kdX7rL6B7yuVBgwDHT
c+XvvqDtMwt0viAgxGds8AgDelWAf0ZOlqf0Hj7h9tgJ4TNkK2PXMl6f+cB7D3hv
l7yTmvmcEpB4eoCHFddydJxVdHixuuFucAS6T6C6aMN7/zHwcz09lCqxC0EOoP5N
iGVreTO01wIDAQABo0IwQDAOBgNVHQ8BAf8EBAMCAQYwDwYDVR0TAQH/BAUwAwEB
/zAdBgNVHQ4EFgQU7UQZwNPwBovupHu+QucmVMiONnYwDQYJKoZIhvcNAQELBQAD
ggIBAA2ukDL2pkt8RHYZYR4nKM1eVO8lvOMIkPkp165oCOGUAFjvLi5+U1KMtlwH
6oi6mYtQlNeCgN9hCQCTrQ0U5s7B8jeUeLBfnLOic7iPBZM4zY0+sLj7wM+x8uwt
LRvM7Kqas6pgghstO8OEPVeKlh6cdbjTMM1gCIOQ045U8U1mwF10A0Cj7oV+wh93
nAbowacYXVKV7cndJZ5t+qntozo00Fl72u1Q8zW/7esUTTHHYPTa8Yec4kjixsU3
+wYQ+nVZZjFHKdp2mhzpgq7vmrlR94gjmmmVYjzlVYA211QC//G5Xc7UI2/YRYRK
W2XviQzdFKcgyxilJbQN+QHwotL0AMh0jqEqSI5l2xPE4iUXfeu+h1sXIFRRk0pT
AwvsXcoz7WL9RccvW9xYoIA55vrX/hMUpu09lEpCdNTDd1lzzY9GvlU47/rokTLq
l1gEIt44w8y8bckzOmoKaT+gyOpyj4xjhiO9bTyWnpXgSUyqorkqG5w2gXjtw+hG
4iZZRHUe2XWJUc0QhJ1hYMtd+ZciTY6Y5uN/9lu7rs3KSoFrXgvzUeF0K+l+J6fZ
mUlO+KWA2yUPHGNiiskzZ2s8EIPGrd6ozRaOjfAHN3Gf8qv8QfXBi+wAN10J5U6A
7/qxXDgGpRtK4dw4LTzcqx+QGtVKnO7RcGzM7vRX+Bi6hG6H
—–END CERTIFICATE—–
—–BEGIN CERTIFICATE—–
MIIFFjCCAv6gAwIBAgIRAJErCErPDBinU/bWLiWnX1owDQYJKoZIhvcNAQELBQAw
TzELMAkGA1UEBhMCVVMxKTAnBgNVBAoTIEludGVybmV0IFNlY3VyaXR5IFJlc2Vh
cmNoIEdyb3VwMRUwEwYDVQQDEwxJU1JHIFJvb3QgWDEwHhcNMjAwOTA0MDAwMDAw
WhcNMjUwOTE1MTYwMDAwWjAyMQswCQYDVQQGEwJVUzEWMBQGA1UEChMNTGV0J3Mg
RW5jcnlwdDELMAkGA1UEAxMCUjMwggEiMA0GCSqGSIb3DQEBAQUAA4IBDwAwggEK
AoIBAQC7AhUozPaglNMPEuyNVZLD+ILxmaZ6QoinXSaqtSu5xUyxr45r+XXIo9cP
R5QUVTVXjJ6oojkZ9YI8QqlObvU7wy7bjcCwXPNZOOftz2nwWgsbvsCUJCWH+jdx
sxPnHKzhm+/b5DtFUkWWqcFTzjTIUu61ru2P3mBw4qVUq7ZtDpelQDRrK9O8Zutm
NHz6a4uPVymZ+DAXXbpyb/uBxa3Shlg9F8fnCbvxK/eG3MHacV3URuPMrSXBiLxg
Z3Vms/EY96Jc5lP/Ooi2R6X/ExjqmAl3P51T+c8B5fWmcBcUr2Ok/5mzk53cU6cG
/kiFHaFpriV1uxPMUgP17VGhi9sVAgMBAAGjggEIMIIBBDAOBgNVHQ8BAf8EBAMC
AYYwHQYDVR0lBBYwFAYIKwYBBQUHAwIGCCsGAQUFBwMBMBIGA1UdEwEB/wQIMAYB
Af8CAQAwHQYDVR0OBBYEFBQusxe3WFbLrlAJQOYfr52LFMLGMB8GA1UdIwQYMBaA
FHm0WeZ7tuXkAXOACIjIGlj26ZtuMDIGCCsGAQUFBwEBBCYwJDAiBggrBgEFBQcw
AoYWaHR0cDovL3gxLmkubGVuY3Iub3JnLzAnBgNVHR8EIDAeMBygGqAYhhZodHRw
Oi8veDEuYy5sZW5jci5vcmcvMCIGA1UdIAQbMBkwCAYGZ4EMAQIBMA0GCysGAQQB
gt8TAQEBMA0GCSqGSIb3DQEBCwUAA4ICAQCFyk5HPqP3hUSFvNVneLKYY611TR6W
PTNlclQtgaDqw+34IL9fzLdwALduO/ZelN7kIJ+m74uyA+eitRY8kc607TkC53wl
ikfmZW4/RvTZ8M6UK+5UzhK8jCdLuMGYL6KvzXGRSgi3yLgjewQtCPkIVz6D2QQz
CkcheAmCJ8MqyJu5zlzyZMjAvnnAT45tRAxekrsu94sQ4egdRCnbWSDtY7kh+BIm
lJNXoB1lBMEKIq4QDUOXoRgffuDghje1WrG9ML+Hbisq/yFOGwXD9RiX8F6sw6W4
avAuvDszue5L3sz85K+EC4Y/wFVDNvZo4TYXao6Z0f+lQKc0t8DQYzk1OXVu8rp2
yJMC6alLbBfODALZvYH7n7do1AZls4I9d1P4jnkDrQoxB3UqQ9hVl3LEKQ73xF1O
yK5GhDDX8oVfGKF5u+decIsH4YaTw7mP3GFxJSqv3+0lUFJoi5Lc5da149p90Ids
hCExroL1+7mryIkXPeFM5TgO9r0rvZaBFOvV2z0gp35Z0+L4WPlbuEjN/lxPFin+
HlUjr8gRsI3qfJOQFy/9rKIJR0Y/8Omwt/8oTWgy1mdeHmmjk7j1nYsvC9JSQ6Zv
MldlTTKB3zhThV1+XWYp6rjd5JW1zbVWEkLNxE7GJThEUG3szgBVGP7pSWTUTsqX
nLRbwHOoq7hHwg==
—–END CERTIFICATE—–
after doing so was able to import these into vcenter using the certificate manager in the shell.